Biofond Foundation Makeup is incredibly versatile and beautiful. So what’s the best way to wear it? Well, that depends on how much coverage you want.


Biofond Foundation Makeup is incredibly versatile and beautiful. So what’s the best way to wear it? Well, that depends on how much coverage you want.
What is a makeup primer and why do I need to use one? Do ingredients really matter? Whether you wear full coverage makeup or simple, barely-there color, makeup primer is an important player in your beauty routine.

Are you planning any trips this summer? If you’re anything like me you just wanna get out of the office and want to spend some carefree downtime in the sun and by the water. When I travel for fun, I tend to also be carefree in my packing (read: lazy) but there are a few beauty products I never, ever travel without.

Is your skin flaking? Breaking out? Red and patchy? It’s a cry for help from your complexion and we’re here to help you decode what you need to make peace with your skin. Continue reading “Skinfood; skin cravings decoded”

Here comes the Bride! It’s that season again, the flowers and love are blooming everywhere it seems! This year the minimal makeup look is on trend in the bridal scene, here are a few ideas on how to make it work for you – as a bride or a guest. Continue reading “Minimal Bridal Makeup”

There are so many companies that make promises their products just can’t keep. So how do you reach your skin’s most beautiful potential? It’s really pretty easy… 3 steps easy.

Be gorgeous this year! Have you made a New Year’s Resolution to be healthy? Don’t forget about the health of your skin.
I had a client a little bit ago that doesn’t ever wear makeup. How would it be? Her skin was flawless, eyes were beautiful and she has naturally pink lips. However, for her wedding, she wanted to accentuate her already flawless look. She was super concerned with contouring because she thought it would make her look too done up. I assured her that I would make her look beautiful, yet natural. 
Step 1: I started with a light contour. I used Gerda Spillmann Bronze Special Bio Fond Foundation. I love the natural bronze that it gives. I shaded under her cheekbones and just a little under her bottom lip.
Tip: Pay attention to where the light naturally highlights your features and what is naturally shaded.
Step 2: I highlighted under her eyes (in a v-shape), bridge of her nose, a triangle on the forehead (just above the nose), the tip of her nose and her chin. I used Gerda Spillmann Highlighter Bio Fond Foundation.
Step 3: I blended all the contouring together with a beauty blender and her color of foundation. I used Gerda Spillmann Bio Fond Foundation in Top Chic (she has a very natural, beautiful tan. Top Chic matched perfect).
Step 4: I used the Chubby Eye Pencil in blizzard from Crown Brush just on top of her lid. This will help keep your eyes appearing bright and open (great technique for those late nights when you really are tired, or for any other time really). I also used it as a highlighter under the arch of her eyebrows.
Step 5: I used the 28 Color Neutral Eye Palette from Crown Brush. I deepened her crease with a neutral brown color and I used the “Round Tapered Crease” brush and then the “Pro Blender Crease” brush to sweep the color up and out a little bit.
Step 6: Using the same color palette, I lined her eyes with black using the “Silicone Angle Liner.” Using powder gives you a  softer look than a pencil, gel or liquid liner.
Step 7: Darken your eyebrows. For a natural look, I used “Dark Blonde” Eyebrow Mousse from Blinc.
Step 8: False Lashes. I know you think that these are not natural, but you can actually find some really natural looking ones. They will open your eyes and make  them stand out even more. When you place the glue onto the lashes, allow it to become tacky to the touch before applying. This will make them easier to place
Step 9: Mascara to blend in your real lashes to the falsies.
Step 10: 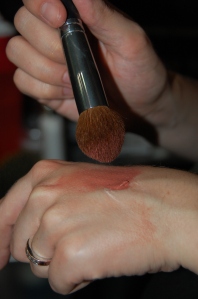 Blush! Apply to the apples of your cheeks. When you are looking straight into the mirror, the blush application should not go past your pupils towards your nose. Then sweep it up to your hairline. I really don’t have a reason for why blush is one of my last steps. It just happens.
Step 11. I love a good lip stain on a bride. She can kiss and not leave any marks on her new husband and not worry about having to reapply. I wanted a soft pink look, so I used “Infinite Rose” from the Sephora Collection. 
Learn more about Lisa and see her talent and skill on her blog here. Tell us what you love about this tutorial. What kinds of tutorials would you like to see in the future?
